Svenska

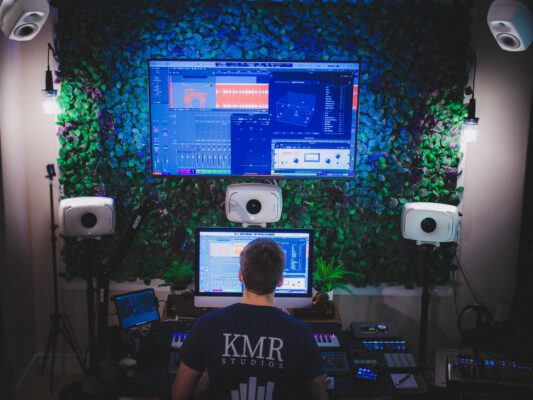

Getting Started with Dolby Atmos Mixing in Logic Pro 11
Mixing for Dolby Atmos in Logic Pro 11 is an exciting process that opens up entirely new dimensions in sound creation. In this article, we present a step-by-step guide to help you set up and complete a Dolby Atmos mix project from start to finish. The guide consists of the following six steps:
- Create an Atmos Project
- Set up the Atmos Plugin
- Create and structure track stacks and folders
- Effect busses and Surround bed
- Experiment with metadata
- Export
By following these steps, you will develop an efficient workflow and be able to create a professional and dynamic soundscape that takes full advantage of the Atmos format’s potential. Although the guide is designed as an overview, it is fairly technical. Are you interested in more basic information about Dolby Atmos? Below, you’ll find an article about what Dolby Atmos actually is and more information about which Dolby Atmos related services we at KMR Studios provide. Two articles about exporting master files from Atmos projects as well as measuring loudness in Dolby Atmos sound can also be found below.
Further Reading
- What is Dolby Atmos?
- Services in Dolby Atmos
- Export master files from Atmos projects in Logic Pro
- Loudness in Dolby Atmos in Logic Pro: A step-by-step guide
Step-by-Step Guide for Dolby Atmos Mixing in Logic Pro 11
1. Create an Atmos Project
Start by creating a new project in Logic Pro 11 and ensure that all project settings are configured correctly:
- Sample Rate: 48 kHz
- Surround Format: 7.1.2
- Spatial Audio: Dolby Atmos
You can set these options by clicking Mix in the top menu bar, then selecting Dolby Atmos. After this, the Atmos plugin will appear on the master track.
2. Set up the Atmos Plugin
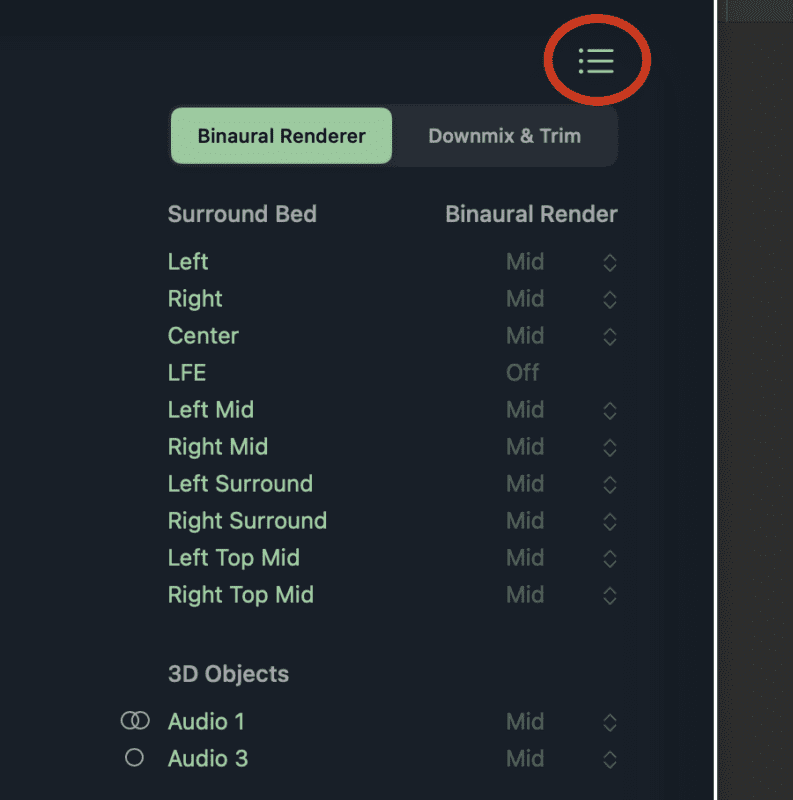
If you don’t have access to a 7.1.4 system, choose Dolby Renderer in the Atmos plugin. Use headphones or a stereo system and click on Binaural Renderer, then select Custom to fine-tune the settings.
-
Metadata Adjustments: Adjust metadata for speaker groups as needed. A good starting point is:
- Left/Right/Center: Off
- Left Mid/Right Mid: Mid
- Left Surround/Right Surround: Mid
- Left/Right Top Mid: Far
- LFE (Subwoofer): Off
-
Downmix and Trim:
- 5.1 to 5.1.x = Direct with room balance
- 5.1 to 2.0 = Lo/Ro Default
-
Trim Controls: Set all Trim Controls to Manual. Ensure Surround and Height are at 0 dB to avoid any impact on LUFS (Loudness Units Full Scale).
-
Import and Adjust Your Audio Files:
- Convert all audio files to 48 kHz before importing into Logic Pro 11.
- Prepare the timeline: Add a few bars at the beginning of the timeline, as skipping this step can cause issues with ADM files.
- Placing Audio Files: Place stems into previously created folders and track stacks, and use the BPM Counter plugin to determine the project’s tempo.
3. Create and Structure Track Stacks and Folders
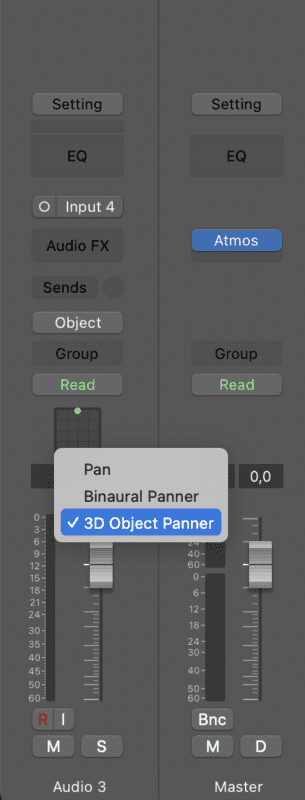
Create track stacks for each instrument or instrument group based on where you envision them in the 3D space. Ask yourself: which instruments or groups do I want to move as separate units in the 3D space? These need to be separate “objects” (a sound unit that you can position in the 3D space).
- If an object is a single track, simply ensure that the panner in the bottom left of the track is set to 3D Object Panner(see image below).
- If an object consists of multiple tracks, create a track stack for these tracks and set the panner similarly for the entire stack, as shown in the image below.
Remember that you cannot place Atmos objects inside a track stack—those tracks can only be in stereo or mono.
How you choose to position these objects is, of course, entirely up to you and a matter of personal preference! That said, there are some general guidelines you can follow if you want to create a more balanced listening experience. These are:
-
- Kick and snare: Center.
- Vocals: Center.
- Effects: Widely placed, preferably slightly elevated.
- Stereo recordings of rhythm instruments like guitar: Wide, to the right and left.
- Ride and cymbals: Slightly elevatedEffect Busses and the Surround Bed
4. Effects’ buses and the Surround Bed
When it comes to working with effect busses, there are essentially two approaches. Either you treat these effect busses as objects (following the same panning procedure as in step 3), or you send them to the Surround Bed. The advantage of sending them to the Surround Bed (also called “the bed”) is that it saves object space, as Atmos is limited to 118 objects, which you might reach when working on very large projects.
The main difference between this and working with effect busses as objects is that when you export, you get all the effects in the same file, which reduces flexibility if you want to export effects separately. To convert an object to something sent to the bed, all you need to do is select “Surround” as the output on that particular track or bus.
5. Experiment with Metadata
When it comes to tips or guidelines for which type of metadata works best, it’s mainly your taste and experience you should rely on. If you’re unsure, “Off” is a safe choice – however, a mix with only objects in the “Off” mode is a stereo mix, which you want to avoid. Sounds that already seem a bit distant “handle” metadata better, which can be useful to remember. Sounds that are meant to be clear, distinct, and close to you (like lead vocals, bass, and drums) often sound best with “Off”. However, we advise you to listen, explore, and evaluate. It’s worth mentioning that if you plan to create a stereo master from your binaural version, you can almost always assume that drums, lead vocals, and bass will sound best with “Off”. This also applies to electric guitars, which are sensitive to metadata when creating a stereo master from the binaural version.
6. Export
When your mix feels nearly finished, the export stage looks a bit different than when mixing in stereo.
- Export the mix: Use the command + B shortcut to export your mix. Export both an ADM BWF file for Atmos and a stereo file for traditional listening.
- Test and compare: Listen to the binaural version with headphones and compare different metadata adjustments to find the best balance between stereo and Atmos.
- Mastering: When the mix is ready for mastering, also create a stereo file that will serve as your final mix version for regular systems.
In terms of exporting ADM files, you can dive deep into the technical details, but that’s beyond the scope of this more general article. However, if you’re interested in learning more about these details, you can read our article specifically about exporting ADM files, or our article on the best ways to measure loudness when working with ADM files.
In Conclusion
Mixing in Dolby Atmos can be a complex but incredibly rewarding process that takes your music to new heights. By following this guide, you now have a solid foundation to build on. If you need further help or want to deepen your knowledge, don’t hesitate to contact us at KMR Studios. We’re here to help you realize your musical vision and increase your visibility in the market. Reach out via the contact form below, and we’ll see how we can support you in your next project.