Save time and achieve better results
Are you learning to mix and want some smart tips to speed up your progress? Or are you an experienced mixer looking for new tricks to streamline your work? Either way, we believe you can benefit from these simple tips. Save time and energy while getting better results!
If you’re interested in having your project mixed by professionals with experience, our mix engineers have mixed hundreds of songs and can assist you. Learn more
Order Mixing Our Music ServicesMixing Tips
1. Use buses
If you have multiple tracks for the same instrument, it can be time-consuming and cumbersome to apply the same tools or effects to each track. Instead, you can use a technique called “bussing.” This involves routing the tracks’ output to a single AUX track, which allows all tracks for the instrument to be affected by the effects applied to the bus. This way, you only need to add a compressor once, for example. It saves time and “glues” the tracks together. Additionally, it requires less CPU, reducing the likelihood of computer crashes.
2. Slapback delay for vocals and melodies
Applying reverb is a common technique to give vocals a sense of space and naturalness, but it can also push the vocals towards the background of the mix. To work around this, you can use stereo slapback delay instead. It sounds natural and not as dry as without the effect, while keeping the vocals upfront in the mix.
3. Add reverb to create cohesion
A common challenge for those recording in home studios is that different instruments are recorded in different rooms, resulting in different room sounds. To create the illusion that they were recorded in the same place, you can add the same reverb to the instruments in post-production. This can be achieved with two different reverbs. One treats early reflections that determine the sound’s distance, while the other handles late reflections that create the sense of space. Different amounts of each instrument are sent to these two reverbs, depending on how you want the instrument to sound.
4. Use reference tracks to make your mix sound good everywhere
A reference track is a well-mixed song in the same genre, style, and/or instrument setup as your song, which can be used as a guide during mixing. Without reference tracks, you mix blindly and risk making changes that only sound good in the studio but not in other contexts. Reference tracks are already optimized to sound good in various playback systems (mobile, car stereo, etc.). By mixing your own song in a similar way, it will also sound good everywhere.
5. Serial compression for natural sound
A common mistake with compression is using too much gain reduction, resulting in controlled but unnatural sound. Instead, you can try serial compression. Rather than using one compressor to compress by 10 dB, use two or three compressors in a row, each compressing around 3 dB. This provides the same control but sounds much more natural.
Bonus tip! Use different amounts of attack and release on the compressors.
6. Focus on volume balance
Just 4 dB too loud for an instrument can ruin the entire mix. Therefore, start with a “height order” approach. Loop the loudest part of the song and lower the volume of everything except the most important element (such as vocals or a particular drum sound), setting it to -5 dB. Then, bring in the next most important element and adjust its volume based on the first element. Finally, bring in the rest of the tracks. Do this at the beginning of the mixing process and revisit it as the mix evolves.
7. Plan before you start
- Balance the volume of all instruments.
- Correct or remove any mistakes or poorly sounding elements.
- Enhance. Make everything sound bigger and more exciting.
- Shape. Give everything a place in the mix. For example, kick and bass in the lower frequencies.
- Space and depth. Pan, add reverb, and delay. Move things to the foreground or background.
8. Mix in mono for a mix that sounds good everywhere
Many devices, such as mobile speakers, play back sound in mono. This can cause issues with stereo mixes. Therefore, it’s recommended to mix parts of the mix in mono to avoid problems (that’s why panning is listed last in the previous point).
A mix that sounds good in mono will sound fantastic in stereo!
9. Perform gain staging for better sound
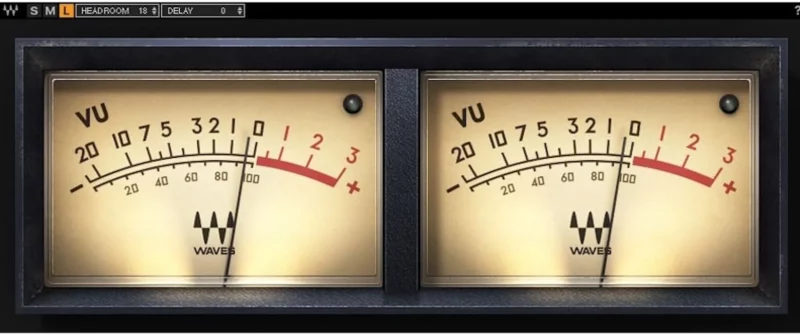
Many plugins are designed based on analog hardware, which is optimized to sound good at 0 dBVU. Through a technique called “gain staging,” you can make your effects sound as good as possible. Use a VU meter and a gain plugin/trim plugin (depending on your DAW). Play a track and adjust the volume in the gain plugin to keep the VU meter around 0 dBVU. Repeat this process on all tracks to make everything you add to the tracks sound better!
10. If it sounds good, it’s good!
Just because something doesn’t adhere to the “rules” doesn’t mean it’s wrong. While there are general guidelines, such as the recommended attack time for a compressor, it’s good to learn them to know when you can break them. Don’t focus on doing things right – focus on what sounds good!
11. Use the right tool for volume automation
Manually editing every audio event on each track takes a long time and requires many unnecessary clicks. Instead, you can use the “marquee” or “selector tool” (different DAWs have different names for it). It helps you select specific parts of a track by simply marking the area, and then you can easily raise or lower the volume. The tool can also be used to make cuts in the track.

12. Use keyboard shortcuts
When mixing and having to listen to the same thing over and over again, it’s easy to tire yourself out. To minimize the time it takes to make each change, you can use keyboard shortcuts. Prioritize functions that you frequently use, such as save, copy, delete, record, add a new track, etc. Every time you go to the menu to perform a task, find out what the keyboard shortcut for it is. It’s worth spending time on in the beginning because everything will go much faster once you’ve learned them.
13. Save a copy of the song before starting the mix
When you feel stuck in the mix or when it doesn’t sound good anymore, you can go back to the copy to see how far you’ve come. It helps you recognize the progress you’ve made! It can boost your confidence and prevent you from giving up.
14. Vary the panning
A song that is 100% stereo all the time is actually 0% stereo. Constant panning is no longer perceived as an effect but rather makes the mix lose power and variation. Therefore, a tip is to make the chorus wider, i.e., more stereo, than the verses. One common technique is to adjust the tracks for the drum overhead mics, making them less stereo in the verses and more stereo in the chorus.
15. Feedback
Send the first draft of your mix to other musicians in your circle and see what they think. Ask about strengths, weaknesses, and what you can do to improve the mix. When you start mixing again, you will immediately understand which direction you need to go in. This also helps you learn to mix faster by discovering your weaknesses and being able to practice on them.
16. Use nudging to tighten your instruments
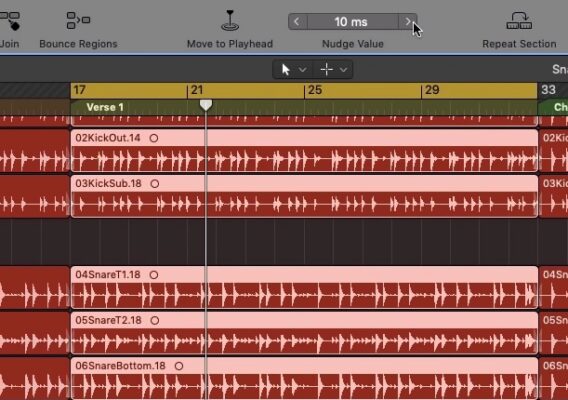
If a musician plays slightly too fast or too slow in a section, you can try nudging that part of the track a few milliseconds forward or backward to see if it solves the problem. This technique is called “nudging.” Move the area 10 ms at a time and listen if it becomes tighter. You can also set the value to 1 ms to get the exact offset needed. Just make sure to fix the “joints” when you’re done by stretching the track and adding crossfades so that there’s no audible glitch before or after the adjusted area.
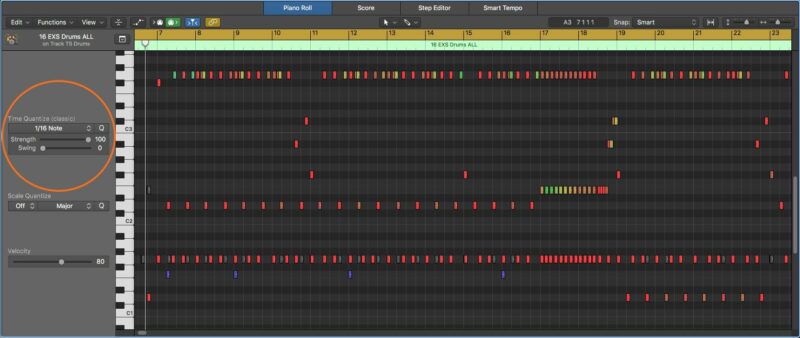
17. Adjust quantize strength to retain the human feel
MIDI instruments can easily be quantized to be 100% in time by pressing Q (quantize) or the equivalent tool in other DAWs. However, this can make the instrument sound robotic. By adjusting the “quantize strength,” you can retain a certain amount of looseness. A value around 50-60% is usually enough to maintain the human feel without it sounding out of time.
18. Don’t try to save a bad recording
Remember the saying, “you can polish a turd, but it’s still a turd.” If the recording is poor from the start, it doesn’t matter how much you tweak it during mixing. Therefore, make sure to record carefully, in a good room with proper microphone placement. The better the recording, the higher the potential during mixing.
19. Rest your ears
The longer you listen to something, the worse your ears become at hearing subtle differences. If you spend many hours in a row listening to the mix, you won’t hear it accurately anymore and risk making poor decisions. Therefore, take breaks of about 30 minutes and have the speakers at a conversational volume (you should be able to talk to someone at the same time). Also, make sure to listen to your reference tracks to refresh your memory of how things should sound.
20. Don’t boost, use a gain plugin instead
What matters more is how an instrument sounds in the context of other instruments, rather than how it sounds on its own. If all instruments are mixed to sound as good as possible individually, they will compete with each other when played together. Therefore, use a gain plugin to raise the volume of the instrument you’re currently mixing and make adjustments based on the context. Then simply turn off your gain plugin.
21. Practice, practice, practice
All the tips are worthless (yes, even the previous 20 tips in this list) if you don’t practice. The best way to practice is to think about what you want to achieve before making a change in the mix. Don’t do something just because someone said you should. Also, remember that every song is unique.
Good luck!
Do you want help with mixing your music?
At KMR, we can assist you with both mixing and mastering your music. If you have any questions, feel free to contact us!
Order Mixing Our Music ServicesGuides
What is a clipper?
Have you started out in the world of mixing and mastering and just came across [...]
5 Clippers taking your mix to new heights
Are you not sure what Clipper to use when mixing and mastering your music? We [...]
Mastering Vocal Harmonies
Read more about what strategies you could use to learn more about, and eventually master, [...]
Export master files from Atmos projects in Logic Pro
This article gives you detailed information on how to export master files from Logic Pro [...]
Contact Us

CONTACT US
OUR PORTFOLIO
Over the past few years, KMR Studios has released hundreds of songs by a wide range of artists. To make it easier for you to find what you’re looking for, we’ve organized the music into various playlists. Click the link below to explore our music by format (stereo or Dolby Atmos) or genre.
Portfolio
 Svenska

