Svenska


How to Hear Compression?
A major obstacle for people who want to learn how to hear and use compression is all the misunderstandings surrounding it (read more about it in our guide 10 myths about compression). Perhaps the biggest hurdle is that compression is difficult to hear. It often takes years of practice and hundreds of mixes to gain a comprehensive understanding. Therefore, we speed up the process with the ultimate guide for your ears – learn exactly what to listen for when using compression! But first, let’s provide a little background.
Why is Compression So Hard to Hear?
There are several reasons why compression is so difficult to hear – and they are often beyond our control. The first reason is that humans have difficulty detecting small variations in volume (between two or three decibels). This is because our ears function as natural compressors that exponentially reduce volume as it gets louder.
Another slightly more technical reason lies in the fact that all compressors affect sound in noticeably different ways. Some compressors control dynamics with surgical precision, while others offer more fluid compression. Some compressor plugins are transparent in design as if they are meant to be felt and not heard, while others distort and color the sound.
A Beginner’s Guide to Hearing Compression
Below, we present a proven method for hearing compression in four simple steps. Once you have a basic understanding of how these steps work, you can start using them to hear the three primary components of compression. These are dynamics, color, and depth.
1. Load a Sample
Load a sample into your music program (DAW). Recordings and samples with a short transient and a heavy reverb work best. This is because they provide the compressor with plenty of information to react to and enough sonorous material to shape and modify.
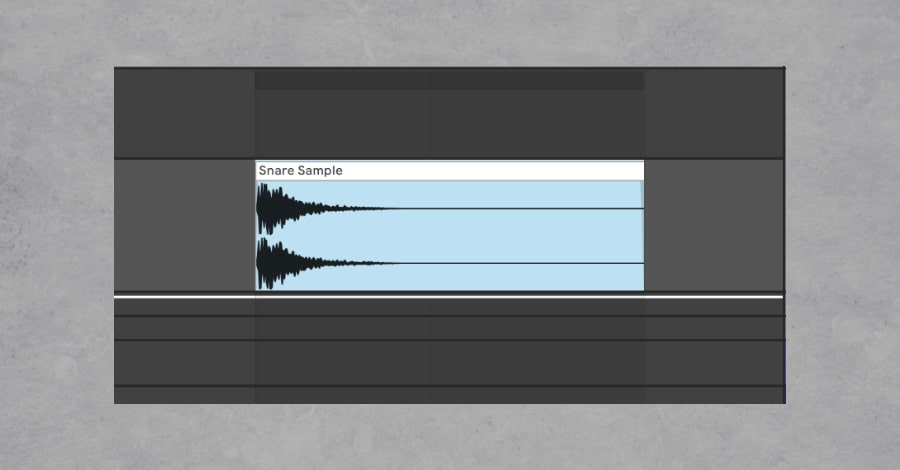
Tips: Start with individual drum hits, such as a snare drum like the one in the image above. Their sharp transients and varying reverberation make changes in dynamics more evident.
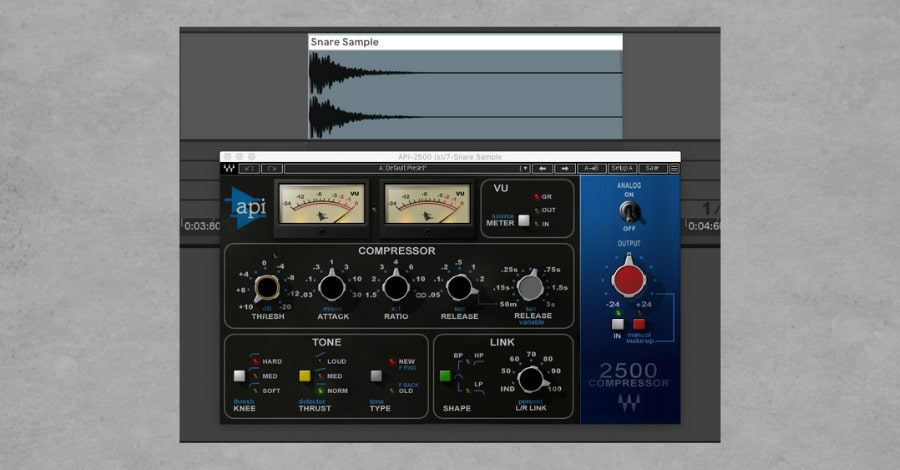
2. Apply a Compressor
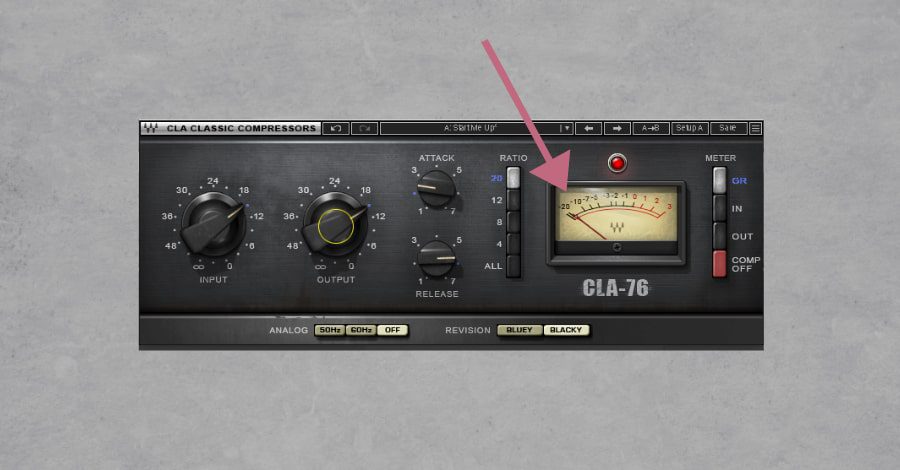
Now it’s time to use your plugins. As mentioned before, all compressors are different. This means that you should choose one that clearly processes the signal (you don’t want the compressor to be transparent as it makes it harder to hear). An example is the Waves API 2500, as seen in the image below. But your DAW’s stock plugin works fine too.
Tips: Some producers prefer an emulation of an analog compressor instead, as these add more color to the signal than digital compressors. The coloring can help emphasize the applied compression, making it even easier to identify when the compressor is active. However, the coloring can also distract and mask the actual changes in dynamics. Try out different models and determine which one works best for you!
3. Make Aggressive Settings
Adjust the compressor’s settings to be as aggressive as possible. By that, we mean, for example, infinite ratio, the lowest possible threshold, extremely fast attack, and a fairly long release. These drastic settings make the compressor’s effect very clear, even to the most untrained ears. We will ease up on these settings later, but for now, try to process the signal as much as possible.
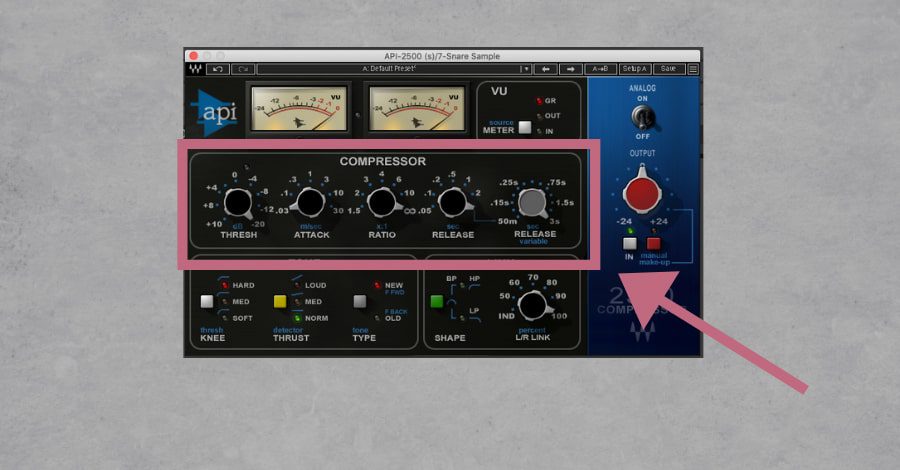
Tips: Set up a keyboard shortcut to quickly enable and disable the compressor, allowing you to easily perform an A/B test, comparing the sound with and without it.
4. Watch and Listen
When you start training your ears to hear compression, it can be helpful to have a visual representation of how compression affects the sound. Think of it as training wheels that you can later disregard once your ears have learned to instinctively recognize compression.
Here are a few simple steps you can take in almost any music program to guide both your ears and your eyes:
- Create an empty audio track below the track with the compressed signal.
- Route the audio from the compressed track to the empty track. Do not move the audio file, but select the empty track as the output for the compressed track.
- Press record and then adjust the compressor’s settings from the most extreme settings.
- Observe the waveforms on the new track and how the shape changes depending on the compressor’s settings.
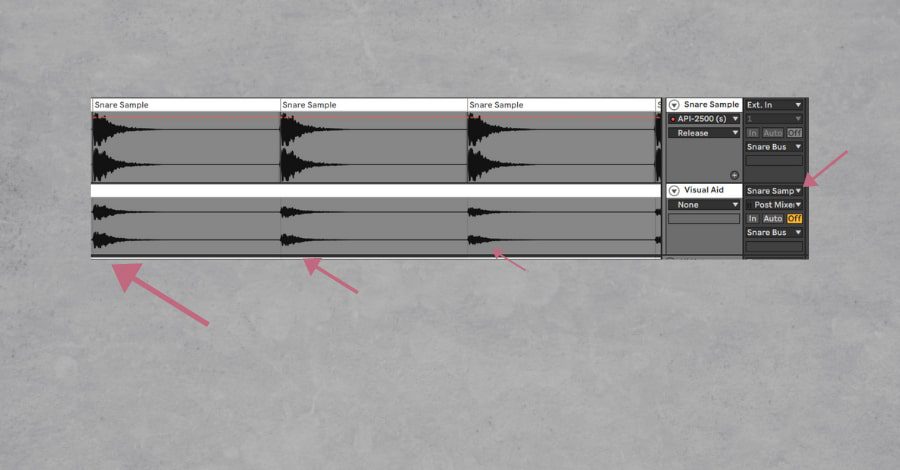
The upper waveform is the uncompressed snare, and the lower one is the compressed snare.
What to Listen for When Compressing
Using the four steps above, you will be able to identify dynamics, color, and depth. However, they require you to listen for slightly different things.
Listen for Dynamics
A compressor works in two ways to control the dynamics of a signal. The first is by raising the volume of the softer nuances of a signal to make them more powerful, compact, and musical. The second way is by reducing the highest parts of the signal to tame the peaks and avoid signal clipping.
As you go through the four steps, you should notice some important differences. The most obvious one is that the sound’s reverberation (“tail”) becomes louder. Does what you hear change when using different loops? What do you hear when going through the steps with a vocal track compared to a drum track? Keep in mind that most loops from sample packs are already heavily processed, so try to find unprocessed recordings.
The less obvious difference, which you may not hear but can clearly see, is that the peaks in the recording are attenuated. If you want to practice hearing this specifically, set the compressor’s attack time so that you have plenty of time to hear it react to the signal’s peaks.
Listen for Color
Hardware compressors are built differently and, therefore, will color the sound in different ways. Some add weight and punch to the mid-frequencies, while others add a clear and aggressive fuzz to the higher frequencies. When training your ears to detect subtle color differences, it’s best to use plugins that emulate hardware compressors. These can include the LA2A or a 1176 compressor. Digital compressors can offer transparent compression, but that’s not what we’re looking for here.
When listening for a compressor’s coloration, we recommend using a sound that already contains a lot of information, such as a heavy electric guitar or synth. This gives the compressor plenty of material to work with. In turn, this can result in relatively consistent coloration when the signal is heavily processed and more sporadic coloration when you ease up on the compressor’s settings.
Listening for coloration differs from listening for dynamics. This is because different compressors have different characteristics that you’re listening for (and yes, you will need to familiarize yourself with a wide range of compressors here). It can be helpful to A/B test two compressors side by side to discover the differences between them.
Consider the following questions when testing a compressor:
- How would you describe the coloration?
- Which frequency range is being colored?
- In what situations would this type of coloration be appropriate, and what would a different compressor do differently in those situations?
Listen for Depth
People perceive depth through comparison. A sound that originates close to us can sound much more detailed than one coming from further away. With the help of a compressor, you can adjust a sound’s ADSR (Attack Decay Sustain Release) to create a similar sense of depth. For example, a longer attack time can create more detailed transients. This is done by adding extra detail to the first milliseconds of the sound, creating a perceived closeness of the sound in the mix. On the other hand, removing details in a sound’s transient (through a faster attack) will make all other sounds feel closer in comparison.
Learning how to hear depth through compression requires involving a few more components. Choose a primary sound whose depth you want to affect and add additional audio tracks with approximately the same volume, such as piano, pads, or drum loops. Go through the four steps again, but instead of listening for specific compressed sounds, direct your attention to the rest of the mix. How do the remaining layers respond to the compressed signal? Does, for example, the piano move forward when the compressor removes the transients?
Try using different compressors for this exercise, as some tend to add a sharper attack, while others have a smooth and almost musical release. All of this can greatly influence how close or far away a sound is perceived in a mix. Typically, your DAW has a compressor where you can manually adjust the attack and release. This allows you to experiment with a single compressor. A drum loop is great for practice!
We recommend experimenting with different compressors. However, it is still better to master one compressor really well than to have a mediocre understanding of 15 compressors.
Good luck with your practice!
It takes a lot of practice to learn to hear compression, but we hope that this guide can help you understand how to hear it. If you have any further questions, feel free to contact us! You can also read more about different types of compressors or about digital compressors in Logic Pro X.
Guides


Music Streaming Services With Dolby Atmos Support
Want to take you music streaming experience to the next level? This article gives you [...]
Movie and Series Streaming Platforms With Dolby Atmos Support
Information for those who want to know more about Dolby Atmos and which film/series streaming [...]

Reach Out To Influencers With SubmitHub
Do you want your music to go viral? You can reach out to influencers with [...]
Contact Us

CONTACT US
OUR PORTFOLIO
LISTEN IN DOLBY ATMOS
LISTEN IN STEREO