Svenska


Part 3 of Dolby Atmos in Logic Pro
In the second part of the Atmos in Logic Pro series, we talked about different ways to play the Atmos format. In this article, we’ll cover how to convert a stereo project to Atmos. We’ll also provide practical tips and advice that can help you achieve high-quality results in Dolby Atmos more quickly.
Stereo → Atmos
When you want to convert a project in stereo to Dolby Atmos, there are primarily two ways to go. Below we will go through the most common way for those who try atmos for the first time. After the example, we will briefly go through the second option. First, you need to find a song in stereo that you want to mix in Atmos and when you open the project, press the following:
File → Project Options → New Option
After pressing “New option” you will be able to type the name of the alternative project. This allows you to have two different versions in the same project – one in stereo and one in Atmos.
Tip! Write what format it is in the name of the project so it will be clear for you to navigate between the options.
Setting up the Atmos project
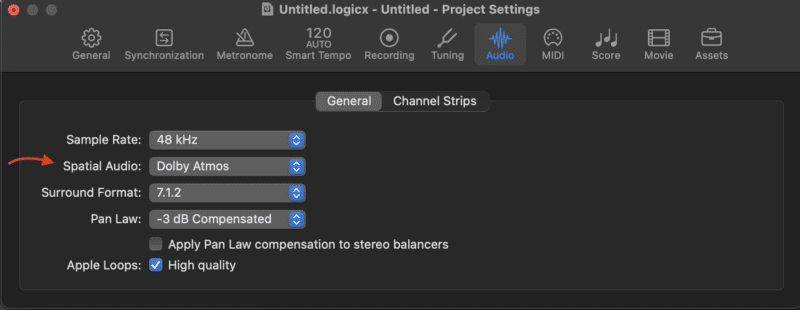
As we wrote in Part 1, you need to press the following to “open up” the project to Atmos:
Project Settings → Audio → Spatial Audio = Dolby Atmos.
Logic will convert your sample rate to 48 kHz (or 96 kHz if you were previously working in it) as the format is played back in these. If Logic does not convert it itself, which sometimes happens, our recommendation is that you export all audio files, increase the sample rate to 48khz and then import the audio files again. This is to ensure that the conversion is correct. If you increase the sample rate without moving the audio files in and out, they will change in time and pitch.
Alternative approach
For those who are trying to work in Dolby Atmos for the first time, we recommend the above way of converting the project. But after you’ve done it a few times, we would highly recommend that you completely change projects when starting a Dolby Atmos mix. That is, instead of converting the project, you export all the tracks from your project to audio files that you then import into a new, empty Dolby Atmos project. The benefits of this are many: more control, less strain on your computer’s CPU, the ability to start working on your own Dolby Atmos template, and much more. It also makes it easier for you when/if you receive Atmos mixes from other musicians.
After this, you will see that some channels in the project have changed panning tools to work in Atmos. However, the channels that have plug-ins on them have not been converted automatically to avoid errors and crashes. You will have to convert these yourself and you can easily do this by changing the output of these channels to “Surround” or “3D object”.
Atmos Monitoring Plug-in
Logic Pro adds a plug-in to your master channel when you convert your project to Atmos. The “plug-in” shows you the different rendering formats you can use and also allows you to switch between the different configurations to play the audio for different rigs. Your choice depends on how you set up your sound system (see part 2). Without this plug-in, the music cannot be played as it acts as a “Dolby Atmos Masterbus” in addition to displaying the different formats. Any plug-ins you add after the Atmos plug have no effect on your music. So what you can use after the Atmos plug is analysis tools.
If you’re working in headphones, you should use Apple Spatial Audio or Dolby Renderer. If you’re working in speakers, you adapt the plug accordingly. Even if you are working in an atmos project, you can set the atmos plug to stereo and work with only two speakers. But we wouldn’t recommend doing that for an entire project.

Things to consider when mixing
When you start mixing in Atmos, there are a few things to keep in mind to get a well-crafted and professional mix ready for release!
LUFS
When you’re mixing in Atmos, you can’t work towards the same LUFS value as you usually do in stereo. There are regulations when releasing music in Atmos. You must not exceed -18 LUFS Integrated. If you go above -18 LUFS, streaming services will deny your mix from being released. So be sure to measure the LUFS value of your mix.
To measure the LUFS value, you need a “Loudness meter” that works for your configuration. That is, if you have 7.1.4, you need a plug-in that works for 7.1.4. Logic’s own “Loudness meter” can do this, but if you want a multi-in-one tool, we recommend Decibel by Process Audio. This plug-in also runs on your iPad or iPhone, meaning you could have the measurement in another window during mixing.
Another quick and reliable way to measure LUFS is by using Dolby’s own Dolby Atmos Renderer. This plug.in allows you to analyze an entire Atmos file (so-called ADM file). It also lets you export the song to other useful formats. But more on that in a future article.
A/B testing with stereo
Even though the project is in Atmos, stereo and mono audio files are still the primary use of the project. This allows you to import your stereo version into the project for reference listening, provided you have a completed stereo master of your song. All you need to do is move the file into the project as a separate track and set the output to Stereo Out. Alternatively, have it as a 3D object where you turn the Binural Render mode to “Off”, which you do in the Atmos plug-in / Dolby Renderer.
3D Object panning
To take full advantage of the format, we recommend that you use 3D objects on the majority of your tracks. This is especially important on objects you will be panning around the room. Doing the panning in the surround panner can cause consequential problems and if you use the binaural panner, you cannot move the object outside the right and left channels.
Explore how music is shaped by changing parameters in the 3D Object Panner. Example: An object placed in stereo can benefit greatly from reducing “spread”, which increases the perceived pressure of the sound. This is great for e.g. a kick or lead vocals.
Binaural Render
When using the Dolby Renderer monitor mode, it’s a good idea to carefully examine the “binaural render” section of the Atmos plug. Here you can adjust how each separate object and bed track will translate to headphones for those listening to music via Tidal or Amazon Music, for example. You can choose between the settings “off”, “near”, “mid” or “far” on the different channels, which we call an object’s meta-data. The sound is then filtered so our ears perceive sounds from different distances. When using Apple Rendering this is not used.
Improving the stereo version
A particularly effective trick for improving the stereo version using Dolby Atmos is to use metadata from the Dolby Renderer. You do this by:
- Listening to Dolby Renderer in stereo speakers and adjusting the metadata until it sounds the way you want. Tip: try turning off the metadata for kick, bass and lead vocals, as this can improve the sound. However, the most important thing to remember about the meta data in relation to stereo is that you should experiment until it sounds good. Don’t necessarily settle for the default setting.
- Make sure it still sounds the way you intended in headphones.
- When you are done with the mix, export your ADM file and import it into Dolby’s own “Dolby Atmos Renderer”.
- Make sure everything is correct and sounds the way you want, then export it to a Binural (BIN) file.
- The BIN file is then mastered in a stereo project just like any stereo mix. The result is a mix with more height, depth and width than traditional stereo.
With this approach in mind, you can benefit from working in Atmos even if you only work in stereo. Even if you don’t intend to upload the Atmos version, you could use this workflow to improve your stereo mix.
Further reading on Dolby Atmos
At KMR we have Atmos services in production, mixing and mastering. If you either want to have your music produced in Atmos, have questions, or want to have your music mixed and mastered in the format, simply contact us!
This was part 3 of the “Atmos in Logic Pro” series. Now we have gone through how to set up your Logic project from stereo to Atmos.
- Read Part 1 – Dolby Atmos in Logic Pro
- Read Part 2 – Listen to Dolby Atmos
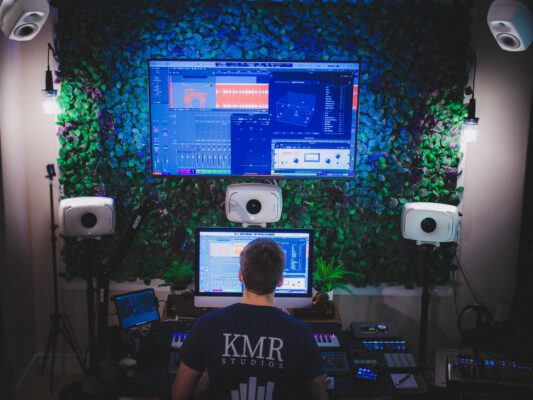
- Explore KMR Studios equipment in Studio A
Read more articles about Atmos
Music Streaming Services With Dolby Atmos Support
Want to take you music streaming experience to the next level? This article gives you [...]
Movie and Series Streaming Platforms With Dolby Atmos Support
Information for those who want to know more about Dolby Atmos and which film/series streaming [...]
3D objects in Logic Pro
This article talks about Dolby Atmos 3D objects in Logic Pro. What does object-based sound [...]
Surround Panner in Logic Pro
This article is about panning in Surround Bed in Logic Pro. We explain what Surround [...]
Contact Us
CONTACT US
OUR PORTFOLIO
LISTEN IN DOLBY ATMOS
LISTEN IN STEREO